Atlas for the Edge: Offline-first Elections Demo
Disclaimer (read this first): MongoDB has discontinued Atlas for the Edge / Edge Server. This post is kept here as a record of a project I built and tested when the technology was available. The ideas (offline-first UX, local read/write, sync when connectivity comes back, edge deployment patterns) still apply. The exact product commands and links may not.
If you want the short version: I built a small electronic voting demo that keeps working when connectivity drops.
- The UI runs close to users (Vercel / Edge-like deployment)
- Data lives in MongoDB Atlas
- A local Edge Server (running on an EC2 instance to simulate a polling station / regional node) keeps a local copy of the data and syncs changes back to Atlas
- When the network goes down, people can still vote locally; when it comes back, changes sync
This is not meant to be a real elections product. It's a technical demo to explore edge data + intermittent connectivity.
If I were building this today
Because Device Sync / Atlas Edge Server are deprecated, I'd keep the same architecture goals (local-first UX + sync when the network comes back), but I'd pick a different sync layer.
MongoDB's Device Sync deprecation page includes a list of alternative solution providers. The ones that feel closest to the original "offline-first + sync" story are:
- Ditto (real-time edge sync platform)
- PowerSync (sync engine for on-device SQLite)
- ObjectBox (on-device database + sync)
Depending on the shape of the system, other options can also make sense:
- AWS AppSync (serverless Pub/Sub APIs)
- Ably (real-time Pub/Sub infrastructure)
- HiveMQ / Cedalo (MQTT-based ingestion / IoT-heavy setups)
- Parse (open source) (backend server + MongoDB Atlas as the database)
- Or a custom sync layer (MongoDB partners can help if you want to build it yourself)
Reference: https://www.mongodb.com/docs/atlas/app-services/sync/device-sync-deprecation/
What I built
A minimal "elections" app with:
- A dataset of citizens (fake data)
- A Next.js frontend where you can cast votes
- A local Edge Server configured to sync only a subset of data (example: one Spanish Autonomous Community)
- A connectivity story: online-first, but safe under temporary network drops
Why edge computing here
If you deploy everything in a single region and your users are far away (or your network is unstable), you get:
- higher latency
- more failures
- and, in the worst case, a full stop if connectivity is gone
Edge computing doesn't magically solve everything, but it helps with two things:
- Latency: run UI and compute closer to the user
- Resilience: keep a local read/write path when the network isn't perfect
Architecture (high level)
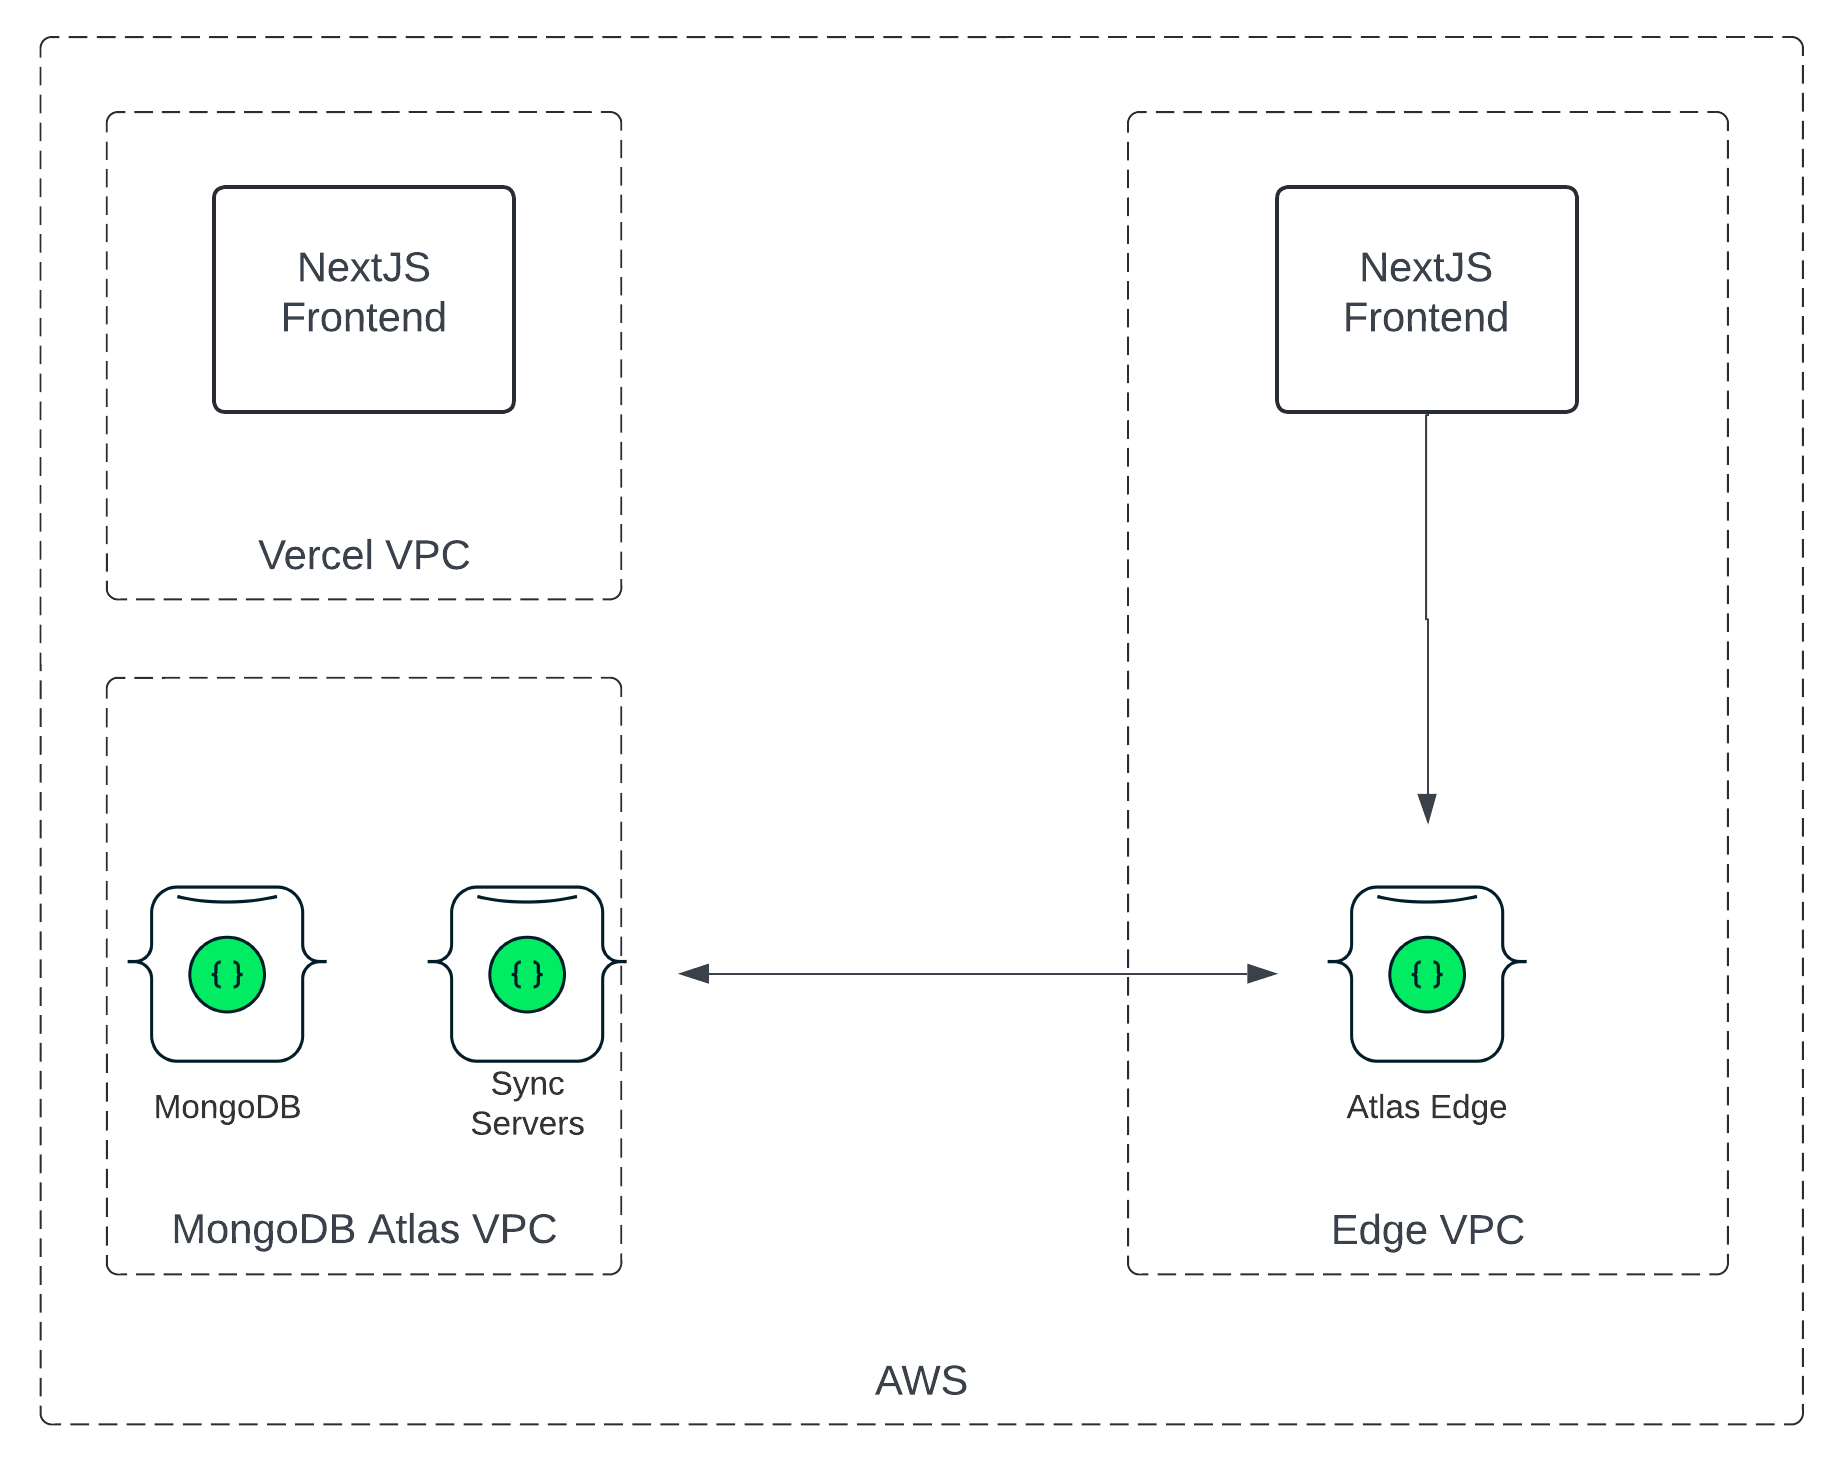
Vercel architecture
The frontend is a standard Next.js app deployed on Vercel. Users hit the nearest edge location, which routes traffic through Vercel's infrastructure.

More context from Vercel here: https://vercel.com/blog/behind-the-scenes-of-vercels-infrastructure
Atlas for the Edge architecture
This was the architecture I tested with Atlas for the Edge:
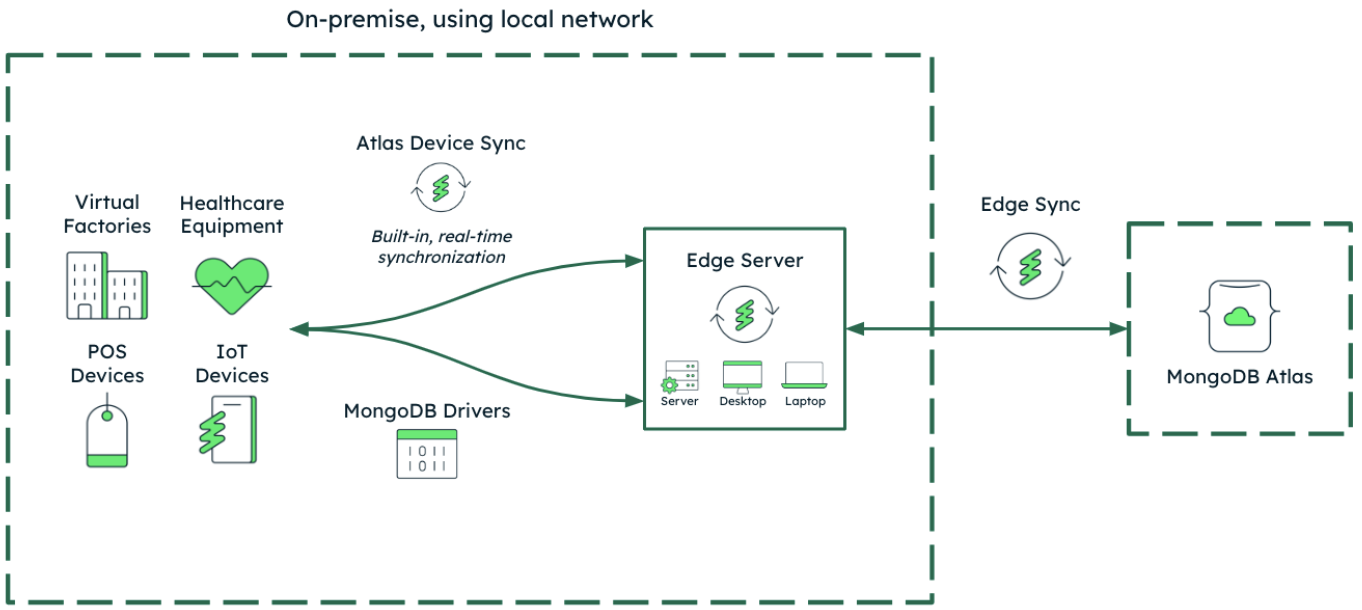
Vercel deploys the frontend and functions. An Edge Server runs locally (here, on EC2) and syncs data with Atlas.
Original product announcement (historical reference): https://www.mongodb.com/blog/post/introducing-atlas-for-the-edge
Walkthrough
I'll keep the walkthrough practical. The goal is not "copy/paste every command". The goal is to understand the flow end to end.
1) Create the Next.js app and deploy to Vercel
npm i -g vercel
npx create-next-app@latest elections-frontend --use-npm --example "https://github.com/vercel/next-learn/tree/main/basics/learn-starter"

npm run dev
vercel
At this point you get a Vercel URL for your frontend.
2) Configure Atlas + Device & Edge Sync
Create a cluster in MongoDB Atlas to store all the data for the elections and then click on Device & Edge Sync to enable Sync.
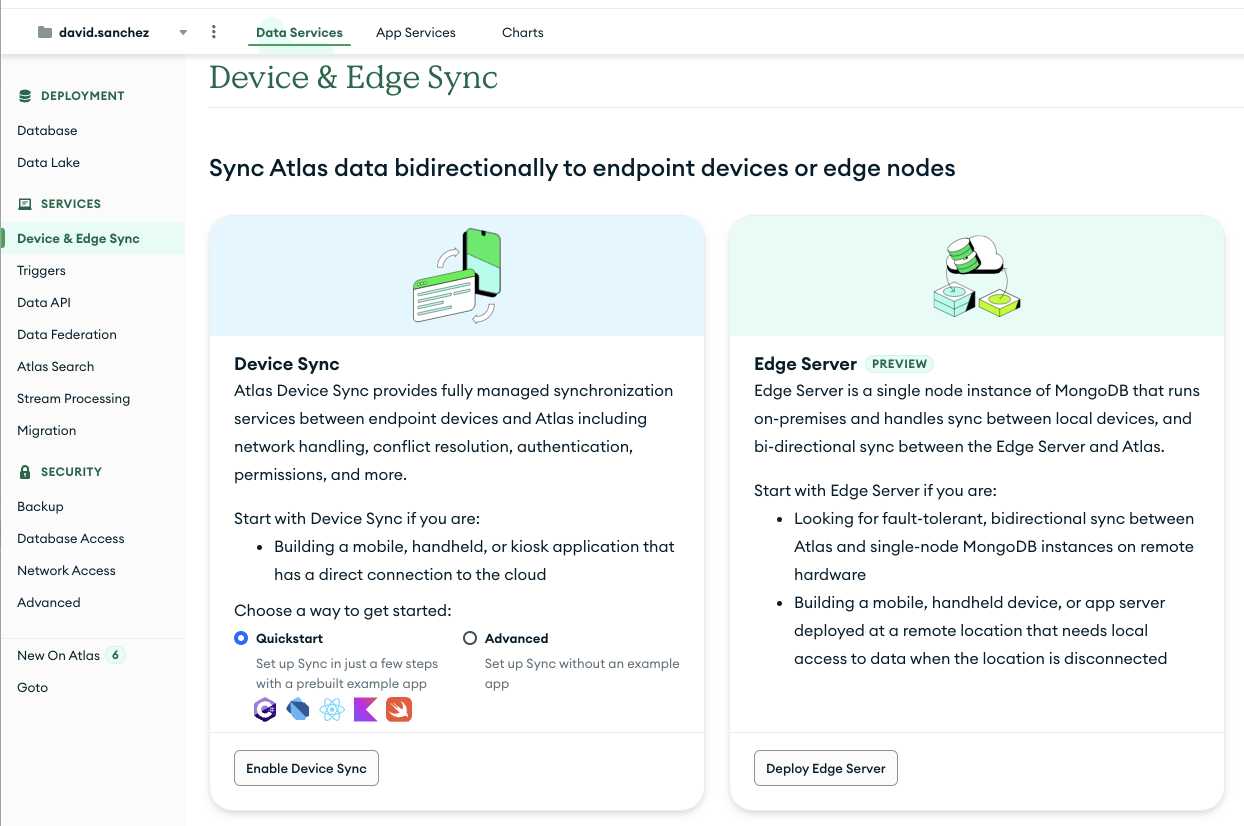
Then define a name for the Edge Server and select the cluster that you have created.
This will generate an installation script and a token.
curl https://services.cloud.mongodb.com/edge/install.sh | bash -s - --app-id=elections-jrvuvzf --platform=compose
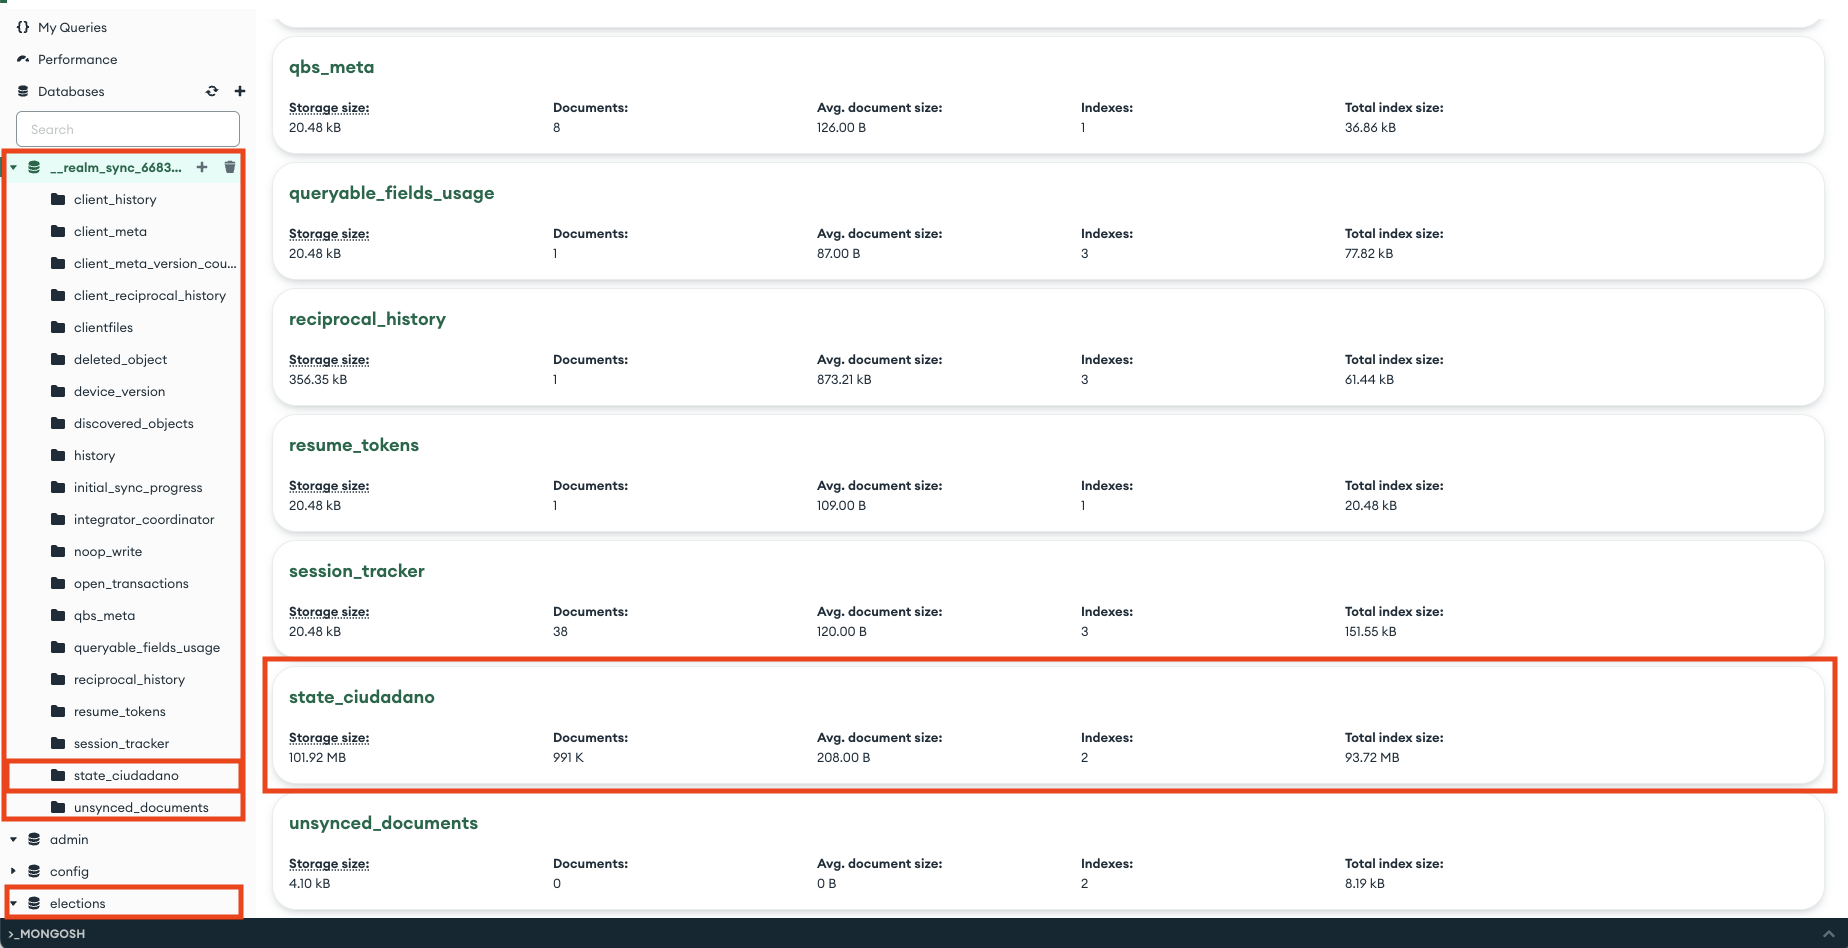
Once you configure Device Sync, the Sync server will create a mirror collection in the database that starts with __realm_sync that will contain all the documents to be synchronised across all clusters.
3) Load data into Atlas
I generated fake citizens (name/surnames/DNI + Autonomous Community). This is just to have a dataset large enough to see sync working.
If you're going to run this locally, don't jump straight to 1,000,000 documents. Start with 10k, make it work, then scale.
(Keeping the original script below in the appendix.)
4) Run an Edge Server node (simulating a polling station / regional data center)
This EC2 instance will simulate a data centre on each Autonomous Community, although it should be more granular so you have a server per polling station. The image selected is ubuntu-jammy-22.04-amd64-server-20240411.
Once created, run the script generated by Atlas.
export PATH="$PATH:/home/ubuntu/.mongodb-edge/bin"
edgectl init --app-id=elections-jrvuvzf --platform=compose
edgectl start
If you don't have docker installed, you have to install it. In Ubuntu 22 you can do that with the following command:
sudo apt update
sudo apt install apt-transport-https ca-certificates curl software-properties-common
curl -fsSL https://download.docker.com/linux/ubuntu/gpg | sudo gpg --dearmor -o /usr/share/keyrings/docker-archive-keyring.gpg
echo "deb [arch=$(dpkg --print-architecture) signed-by=/usr/share/keyrings/docker-archive-keyring.gpg] https://download.docker.com/linux/ubuntu $(lsb_release -cs) stable" | sudo tee /etc/apt/sources.list.d/docker.list > /dev/null
sudo apt update
sudo apt install docker-ce
sudo systemctl status docker
If you find an error like this:
Running 'docker compose --file /home/ubuntu/.mongodb-edge/profiles/elections-jrvuvzf-01/docker-compose.yml up --detach'...
permission denied while trying to connect to the Docker daemon socket at unix:///var/run/docker.sock: Get "http://%2Fvar%2Frun%2Fdocker.sock/v1.46/containers/json?all=1&filters=%7B%22label%22%3A%7B%22com.docker.compose.config-hash%22%3Atrue%2C%22com.docker.compose.project%3Delections-jrvuvzf-01%22%3Atrue%7D%7D": dial unix /var/run/docker.sock: connect: permission denied
Error: failed to run docker compose command: exit status 1
Then you might solve it with the following command. This command is used to give the current user permission to run docker commands without needing to use sudo each time. This is done by adding the user to the docker group.
sudo usermod -aG docker $USER
Then you can connect to MongoDB using the following command
mongosh --username myuser "mongodb://localhost:27021?authMechanism=PLAIN"
If mongosh is not installed, you can use the following command to add the MongoDB repo
curl -fsSL https://pgp.mongodb.com/server-7.0.asc | \
   sudo gpg -o /usr/share/keyrings/mongodb-server-7.0.gpg \
   --dearmor
echo "deb [ arch=amd64,arm64 signed-by=/usr/share/keyrings/mongodb-server-7.0.gpg ] https://repo.mongodb.com/apt/ubuntu jammy/mongodb-enterprise/7.0 multiverse" | sudo tee /etc/apt/sources.list.d/mongodb-enterprise-7.0.list
sudo apt-get update
sudo apt-get install -y mongodb-mongosh=7.0.7
Once you connect to the cluster, you will see that all the data loaded into Atlas has now been loaded into the cluster.
5) Scope sync to a subset of data
If you don't specify a query, an Edge Server instance defaults to a global query of "*", which automatically syncs all data in all of the collections in your linked data source.
We want to sync only data for Extremadura, to do that, we have to pick the name of the schema in App Services and then the query to apply when syncing the data.
edgectl config --query="ciudadano: comunidad == 'Extremadura'"
More info about Edge Server config here
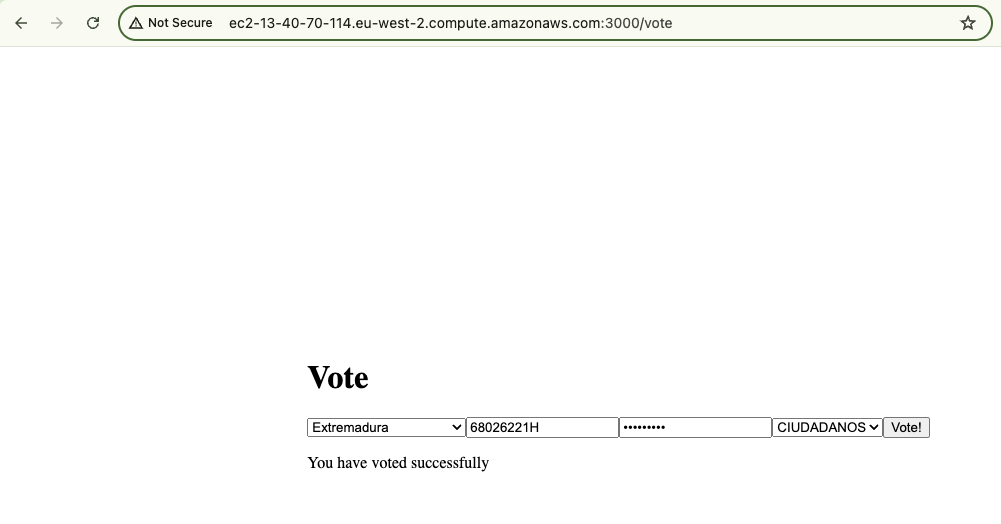
6) Run the frontend locally against the Edge node (offline mode)
The deployed Vercel frontend is great for the online path:

- Voting app link: https://elections-frontend-six.vercel.app/vote
But the interesting part is running it on the edge node (local) so it still works when connectivity drops.
Build locally:
vercel build
I zipped the app and copied it to the EC2 box:
scp -i "david-sanchez.pem" /Users/ds/elections/elections-frontend.zip ubuntu@ec2-13-40-70-114.eu-west-2.compute.amazonaws.com:~
Then I switched the .env to point to the local Edge instance:
# Online
# MONGODB_URI=mongodb+srv://USERNAME:PASSWORD@elections.zz2pp.mongodb.net/?retryWrites=true&w=majority&appName=Elections

# Local edge
MONGODB_URI=mongodb://USERNAME:PASSWORD@localhost:27021?authMechanism=PLAIN
At this point, the app runs locally and can keep accepting votes even if the network is gone.
What I learned
1) Offline-first isn't a feature, it's a system
You need to think about:
- conflict resolution
- what "write succeeded" means when you're offline
- how you reconcile state when connectivity returns
- what data you actually need locally (scoping matters)
2) Scoping data is everything
If you sync *, you'll pay for it in storage, bandwidth, and operational complexity. In real scenarios, you want a clear rule:
- per polling station
- per region
- per user cohort
3) Your UX needs to communicate state
If you're offline, the app should say it. If you're syncing, the app should say it. If there's a conflict, the app should handle it.
FAQ
Is there any associated cost to run this architecture?
It depends on volumes, but costs typically increase because:
- Data size: enabling sync creates mirror collections (
__realm_sync...) that effectively duplicate data you choose to sync. - Resources: change streams + sync logic add load. You may need to scale the cluster.
- App Services billing: multiple Edge nodes continuously syncing can burn through the free tier (runtime, data transfer, requests, compute). Docs: https://www.mongodb.com/docs/atlas/app-services/billing/#billing
"Synchronization ... stopped: cannot open a changestream against a paused cluster"
This happened because the Atlas cluster was paused.
Solution: resume the cluster and restart the sync process.
Links
- Next.js learning resources:
Appendix
Citizen data generator (original script)
import os
from dotenv import load_dotenv
from pymongo import MongoClient
import random

load_dotenv()

mongo_uri = os.getenv("MONGO_URI")
mongo_db = os.getenv("MONGO_DB")
mongo_collection = os.getenv("MONGO_COLLECTION")


def generate_dni():
    dni = ""
    for _ in range(8):
        dni += str(random.randint(0, 9))
    checksum = calculate_checksum(dni)
    return dni + checksum


def calculate_checksum(dni):
    checksum_letters = "TRWAGMYFPDXBNJZSQVHLCKE"
    dni_number = int(dni)
    checksum_index = dni_number % 23
    return checksum_letters[checksum_index]


client = MongoClient(mongo_uri)
db = client[mongo_db]
collection = db[mongo_collection]

comunidades = [
    "Andalucía", "Aragón", "Asturias", "Baleares", "Canarias", "Cantabria",
    "Castilla y León", "Castilla-La Mancha", "Cataluña", "Comunidad Valenciana",
    "Extremadura", "Galicia", "La Rioja", "Madrid", "Murcia", "Navarra", "País Vasco"
]

spanish_names = ["Antonio", "María", "Manuel", "Carmen", "José", "Ana", "Francisco", "Isabel", "Javier", "Laura"]
spanish_surnames = ["García", "Rodríguez", "González", "Fernández", "López", "Martínez", "Sánchez", "Pérez", "Gómez", "Martín"]

batch_size = 50000
citizens = []

for _ in range(1000000):
    name = random.choice(spanish_names)
    surname1 = random.choice(spanish_surnames)
    surname2 = random.choice(spanish_surnames)
    comunidad = random.choice(comunidades)
    dni = generate_dni()

    citizen = {
        "name": name,
        "surname1": surname1,
        "surname2": surname2,
        "dni": dni,
        "comunidad": comunidad,
    }

    citizens.append(citizen)

    if len(citizens) == batch_size:
        collection.insert_many(citizens)
        citizens = []

if citizens:
    collection.insert_many(citizens)

client.close()
Docker install (Ubuntu 22) + permissions
sudo apt update
sudo apt install apt-transport-https ca-certificates curl software-properties-common
curl -fsSL https://download.docker.com/linux/ubuntu/gpg | sudo gpg --dearmor -o /usr/share/keyrings/docker-archive-keyring.gpg
echo "deb [arch=$(dpkg --print-architecture) signed-by=/usr/share/keyrings/docker-archive-keyring.gpg] https://download.docker.com/linux/ubuntu $(lsb_release -cs) stable" | sudo tee /etc/apt/sources.list.d/docker.list > /dev/null
sudo apt update
sudo apt install docker-ce
sudo systemctl status docker

# If you see docker.sock permission issues
sudo usermod -aG docker $USER